Canning Lid Ornaments ~ Making Memories

As you know by now, I am not only thrifty but a huge advocate of the “Waste Not, Want Not” mentality. I also love to can my home grown foods. Over the years, I’ve saved my used canning lids and rings in the hopes of making something from them. For Autumn, I made a canning ring pumpkin, but that’s as far as I got. Until now.

I had come across something online where ornaments were made with tiny embroidery hoops. Well, I didn’t have any embroidery hoops, but I did have canning rings! So I improvised. And I’m so glad that I did!

I gathered everything that I thought I’d be able to use. Old jewelry, sweaters, wrapping paper, bits of burlap, twine, Christmas cards and anything else I could think of. Only other things I needed were scissors and a hot glue gun.

ornaments3

Turns out, it was one of the easiest projects I had ever done. I simply cut out fabric, paper, cards, etc to fit onto the canning lid. I tied whatever material I was going to use to hang the ornament onto the ring. I then inserted the lid and covering material into the canning ring. A few dabs of hot glue on the back secured the lid onto the ring. I then adorned it with any other objects I thought would look nice. Mostly, I used pieces from old costume jewelry. And presto! New Christmas ornaments, made with old memories. This is the first one, made from sweater material:

ornaments2

Not bad, huh? After the first one turned out well, I forged ahead with more. I made some with burlap coverings that were adorned with old clip earrings, wrapping paper with twirly ribbon, Christmas fabric with buttons and each one started to take on it’s own personality. I absolutely loved that!

I came across some vintage post cards that my mother had given to me several years ago. I then made an ornament just for her. I used two old bracelets (one as the hanging loop and one framing the ring) and a few baubles from another bracelet. I think it turned out great and can’t wait to make more like it!

ornaments

So now you know something you can do with all of those old canning rings and lids. You can preserve memories! Living frugally can be so very beautiful. Waste nothing.

Posted in Uncategorized | 2 Comments

The $2.75 “Semi-Homemade Go~To” Gift ~ Any Time of the Year (No Cook/Bake)

We all have those hard to buy for people on our lists at Christmas. Neighbors, co-workers, service workers, etc. But this also applies year-round. How about a small thank you gift? Or how about just because you like the person?

Let’s face it. Time is of the essence in most of our lives. Yes, we’d love to make all of our gifts by hand, roll out the baked goods like we were Betty Crocker herself and even wrap our gifts in ribbon that was hand woven by us in our spare time. Uh…not gonna happen! So instead…how about a gift that is easy, quick, will be enjoyed by all and most of all…gives an air of “homemade”.

buttergift

All you need to do is head to your nearest Dollar Tree, grab a pound cake and a pack of small plastic food storage containers (really small ones). Now, bring a stick of butter (the real stuff please!) to room temp. Divide the butter in half and make two small batches of flavored butter, using whatever you have on hand. Grab one of those Christmas tins that we all have stashed away. Now line it with tissue paper and a white paper towel. Slice the pound cake, lay it neatly in the tin and place the butter inside in two of those small plastic containers that you just snagged at the Dollar Tree. (make sure the flavors are labeled somewhere on them) Place the lid on the tin and Presto!!! A beautiful, yummy semi-homemade gift!

Don’t like the idea of pound cake? Dollar Tree also has bagels. Individually wrap the bagels (or muffins) in plastic wrap, place your yumminess in a basket or larger tin and you have a great alternative.

buttergift3

The butters that I made were honey/cinnamon and a cranberry/almond/citrus combo. You can find tons of recipes online, but you can also just toss in what you have. The honey/ cinnamon is pretty self explanatory. Squirt some honey into the butter, sprinkle some cinnamon and mix well. So very delicious! For the cranberry combo, I used dried cranberries, clementine juice and zest and when I saw that I didn’t have any almonds…I grabbed one of my favorite snacks and chopped up two of the snack squares. Improvise!

buttergift2

Here’s the cost breakdown of my gift:

  • Pound cake $1.00
  • Butter $.50
  • Fixin’s (a few cranberries, two pecan squares, a squirt of honey, etc) $.50
  • Plastic containers $.50 (A pack of 4 was $1.00)
  • Christmas tin ~ free (salvaged from a gift from my mother 2 years ago) BUT…thrift stores are full of them right now for as little as $.25 if you don’t have one.

This tin is going to my doctor’s office with me tomorrow. I’m giving it to the staff because they are all super-awesome! So now you know how to give a terrific semi-homemade gift in record time, very frugally and that your recipient will totally love. Hope this helps!

Posted in Uncategorized | Leave a comment

Pumpkin Spice Sugar Scrub

pumpscrub

I love, love, love Autumn! The air, the smells, the earth tones…and of course the tastes! Pumpkin season is here. I like experimenting with homemade scrubs and lotions and found a recipe for Pumpkin Spice Sugar Scrub that I tweaked to make my own.

Here’s what you’ll need:

  • 2 cups sugar (I used organic)
  • 1/2 cup coconut oil (I used organic)
  • 1 tsp pumpkin pie spice
  • 1/2 tsp vanilla extract (I used homemade)
  • 1/4 tsp ground cinnamon
  • 1/8 tsp ground cloves
  • olive oil to drizzle
  • food coloring (optional)

Here’s what you do:

Heat the coconut oil on low heat to melt. Add spices and vanilla extract to the melted coconut oil. Whisk well to incorporate. Pour that mixture over the sugar in a medium bowl. Stir to incorporate.

Your scrub will be a light brown in color and semi-dry in texture. If you want to color it for layers, divide the scrub into 3 smaller bowls.

To one bowl, add 4 drops of yellow food coloring. Stir to incorporate.

To the second bowl, add 4 drops of yellow and 3 drops of red. Stir to incorporate.

You’ll feel tempted to use more coloring, but please don’t unless you want the skin to be colored after using it. :-/

Layer your scrub into jars and drizzle a small amount of olive oil over the top, just to moisten. Tie a pretty bow onto the jar and there you have it!

Oh…the smells of Autumn. I just can’t get enough!!

Posted in Crafts, Gift Ideas, Recipe | Tagged , , , , , , , | 5 Comments

Homemade “Doritos”

doritos2

I don’t know about you, but my major cravings when it comes to food always fall in the “cheesy, salty, crunchy” category. But, now that I have turned to a gluten and dairy free diet, that is almost always out of the question. I also have to eat as clean as possible. Doritos (nacho cheese flavor) used to be an all-time favorite snack. I’d lay them on a cookie sheet, put a slice of cheddar on each one and broil until that cheese was bubbling to perfection. But…I digress. Doritos. What a wonderful concept. A perfect food…that is, if they didn’t have MSG, Disodium Dinosinate, Maltodextrin or any other ingredients that I need a PhD in chemistry to understand.

Well, I craved…and craved my Doritos. And then I found a recipe that sounded too perfect. A mock Dorito if you will. What?? Something that may taste like my beloved Doritos without the cheese flakes and the chemistry? Gimme! I took the recipe and then tweaked it to fit my taste buds.

So I gave it a shot. And lo and behold…they are fabulous! Now granted, they don’t taste exactly like a Dorito. How could they? But they are a wonderfully flavorful bite of goodness that helps eliminate my cheesy/salty/crunchy craving in one bite.

They are very simple to make. Here’s how:

First, mix up your seasoning ~

  • 1/4 cup nutritional yeast
  • 2 tsp paprika
  • 1 tsp chili powder
  • 1 tsp onion powder

First, give the nutritional yeast a whir in the a coffee/spice grinder to make it into more of a powder so all of your ingredients are the same consistency. I mix then mix this up and put it into a shaker container. (Makes it easier to distribute onto the chips evenly). You can use an old parmesan cheese shaker if you don’t have one.

Heat up about an inch of vegetable oil in a large skillet. I use my fave cast iron pan. While the oil is heating, cut small corn tortillas into wedges using a pizza cutter. When your oil is hot, fry as many wedges as will fit into the pan without touching each other. Fry until golden brown, turning once. Place immediately onto a paper towel and shake with seasoning mixture, adding sea salt if you’d like. (I recommend it) Turn the chips over and do the same to season that side as well.

doritos

It’s important that you season the chips immediately. The oil will help the seasoning stick to the chip.

Continue to fry and season until you have your desired amount, transferring seasoned chips to an airtight container as you work. That way, you can seal them up if you don’t eat them right away. (Just don’t seal if the chips are still warm, this will produce moisture inside of your container and you’ll have soggy chips).

That’s it! The nutritional yeast provides a cheesy flavor, the chili powder gives it a little kick and the rest of the seasonings add a great depth. I’ll also be experimenting with other seasonings and let you know how I make out.

Posted in Frugal Meals, Recipes | Tagged , , , , | 2 Comments

Pickled Radish Pods

Radishes. They’re temperamental at times. They can grow into beautiful orbs of peppery goodness or you can turn your back on them and they can bolt, leaving you with harsh, hot and practically inedible roots. But don’t despair! Just let those darn things in the ground and set your sights on the “second harvest” of radishes. Their seed pods!

radishpods

Radish seed pods are edible and give you a milder radish-y taste. There is actually a variety of radish that you can grow specifically for the pod (they will not produce an actual radish bulb). They are called Rat Tail Radishes. Whether you grow Rat Tail Radishes or any other variety of radishes, harvesting the seed pods are smart. They are great raw. Use them in salads or on a platter with other crudites. Or, if you’d like to save them for later, pickle them, like I’ve done here.

If you’d like, leave a few radishes in your garden on purpose to go to seed. Gather the pods before they flower. Like a lot of veggies, the smaller they are…the more tender they are. I try to get them at medium size. Here’s what you do: (This recipe assumes that you are familiar with water bath canning. If you are not, please familiarize yourself before attempting).

After gathering the pods, snap off the stem that you will certainly have attached to most of them. Start your water bath canner and sterilize your jars. (I use pint jars, usually only have enough for two of them at a time) Put your canning lids in a small saucepan and simmer.

Meanwhile, prepare the brine. You will be using 50/50 water/vinegar. Simply measure the brine according to how much you are making. For instance, if you are making two pints…Fill one pint jar with vinegar and one with water. Put them into a sauce pan. For each pint you are making, use 1 tablespoon of canning salt and 1 teaspoon of sugar. Add that to the brine. Bring the brine to a boil.

Put a bay leaf into the bottom of your sterilized jars. Pack your radish pods into the jars. Pour the brine over the pods, leaving 1/2 inch headspace. Put the lids on finger-tight. Process in a water bath for 10 minutes.

radishpods2

And there you  have it! You can certainly use any pickling brine that you may already love for this recipe. Don’t you just love veggies that give you a second chance and yumminess?

radishpods3


Posted in Uncategorized | Tagged , , , , , , , , , | Leave a comment

Skinny-er Scallion Cream Cheese Spread

This creation emerged after a visit with my daughter to help her search for a new apartment. She’s graduating from college in May and has been offered a job from the company that she is currently interning for. Yay! Anyway…we had stopped at a bagel place to get breakfast and she raved about the scallion cream cheese that came with her everything bagel. I have to admit, it was delicious, but I just knew that the amount of calories and fat on top of my bagel was probably a whole day’s worth.

Even after I returned home, I couldn’t stop thinking about that cream cheese because it was THAT good. My daughter’s birthday was coming up so I decided that I would make a homemade scallion cream cheese as part of her birthday basket. But I also knew that she wanted to watch her fat content. And that’s when the brainstorm hit me. I just KNEW that I could make a scallion cream cheese that was lighter and healthier. I accepted my own challenge.

I hit the nail on the head on the first try. This cream cheese spread is so flavorful and fresh! Here’s my easy recipe:

scallion cream cheese2

Scallion Cream Cheese Spread

  • 1 container (8 oz) of Whipped Cream Cheese Spread
  • 1 container (5 oz) of Nonfat Greek Yogurt
  • 1 cup of diced scallions (about 5 scallions with bulb and stalk included)
  • 3 cloves of garlic, finely minced

Mix all of the ingredients together and refrigerate for at least an hour. That’s it! This spread is terrific with fresh veggies. I especially love it with radishes and celery. Daughter gave it a huge thumbs up as well. Win!

I plugged in the recipe into an online nutritional calculator with the results as follow for a serving of approx 2 tablespoons:

  • calories = 52
  • carbs = 4
  • fat = 4 gr
  • protein = 2
  • sodium = 56
  • sugar = 1
  • Plus you’re getting some good probiotics from the yogurt.

And there you have it! A delightful dip or spread that you don’t have to feel guilty about. Give it a try. I don’t think you’ll be disappointed. By the way…it is divine spread on top of toast made with the Peasant Bread. Yum!!


Posted in Food, Recipes | Tagged , , , , , , | Leave a comment

Listen To Your Angels’ Voices

This is not a post to start a debate or even a discussion about religion, beliefs, spirits, psychic phenomenon or life after death. It is simply me sharing my opinion and a recent experience in my life. So please, take it as such.

Last week my husband and I traveled to Rehoboth Beach, Delaware for a long weekend to celebrate my birthday and to relax for a few days. It was a much needed getaway and we enjoyed every minute. On our first full day there, we lingered in a local coffee shop filling our bellies with freshly baked decadence. I struck up a conversation with our server, who was able to give us directions to all of the best thrift stores in the area. Now that’s MY idea of a vacation!

So off we went…hunting for treasures and taking in the sights. Several times during that morning I got these strong feelings of my sister-in-law Bonnie. We had just lost Bonnie on Christmas to breast cancer and the pain is still fresh. I told myself that I was thinking of Bonnie because we were in a beach town. She had most recently resided in Myrtle Beach. When I’d get another gut sensation, I’d tell myself that I was just seeing things that reminded me of her. These feelings were very strong and would come at the oddest times, when I wasn’t really thinking of anything else, like when I was driving or strolling through a cookware aisle in a thrift shop. I told my husband after the first strong experience and the feeling was so strong that I honestly expected to turn the corner and see her. But of course I didn’t.

We then headed to Cape Henlopen State Park, one of our favorite places to visit when we’re in the area. It was off season, with a cool ocean breeze and the beach was practically deserted.

DSC_0043


As we approached the path to get onto the beach, I started to tear up, again thinking about Bonnie. I told my husband that I can’t get her out of my mind and kept envisioning her walking on the beach collecting shells and searching for sea glass. She loved sea glass. Her eyes were always scanning for the shimmer that would lead her to a small piece of sand-smoothed treasure. He squeezed my hand and said “Well, maybe she’ll send us a sign that she’s with us”.

As we walked onto the beach, I stood still and snapped photos as my husband starting sifting through the line of shells that the tide had left as it receded earlier. He was like his sister in that respect as they both were always amazed by the beauty of nature.

DSC_0046And it took all of about 60 seconds for my husband to find his very first piece of sea glass. A lovely, smooth green trinket deposited on the beaches of Cape Henlopen after it’s journey in the depths of the ocean. He held it up for me to see as we both realized that Bonnie had indeed been with us that morning after all. And the shape of the sea glass just cemented it for us.

DSC_0047So you see, it is my belief that one of our beautiful angels had been traveling with us that morning. It is also my opinion that we are constantly given signs from departed loved ones, of different types of energies in our environment and yes, even a hint of premonitions. Those gut feelings, those nagging thoughts or even those fleeting visions. I believe that they are messages for us. It’s just up to us to figure out what they mean or what they’re leading us to.

My messages from Bonnie lead us to a keepsake and the knowledge that she is still with us. It gave us comfort and provoked memories of a wonderful woman. What will yours lead you to?

Posted in Uncategorized | Tagged , , , , , | 7 Comments

Canning Homemade Beef Broth

I don’t know about you, but I just love it when I can make something that is cost efficient, tastes better that anything you can buy and makes your kitchen smell divine! Yesterday I found a beef soup bone on clearance for $1.04. Needless to say, I grabbed it, brought it home and plopped it directly into my crockpot along with 2 onions (skins on), some fresh parsley and a tad bit of sea salt. It stayed there overnight and when I came down this morning, my kitchen smelled awesome!

I then strained the broth, brought it to a boil and ladled it into 7 pint jars that had already been sterilized. I put the jars into my prepared pressure canner and processed at 11 PSI for 20 minutes. And this is what I got…dark, lovely homemade beef broth. After everything was said an done, I’ll bet it didn’t cost 2 bucks. And it will be waaaayyy better than store bought!

beefbroth

Posted in Canning, Uncategorized | Tagged , , , , , , , , | 4 Comments

Artichoke Hearts Anyone?

I’ll admit it. I love artichoke hearts! I love them so much that when I actually found cans of them at the Dollar Tree…I bought 20 of them. I excitedly brought them home and placed them in my pantry while dreaming of the wonderful recipes that I would create with them. That was last year. Apparently I only created artichoke spectacular~ness about 10 times in the last year because as we were cleaning out the pantry over the weekend we found 10 cans that have an expiration date of May 2014. Luckily, hubby loves artichoke hearts as much as I do so not a problem. That night we started off with baked artichoke hearts. Delish! Last night I created an Artichoke/Spinach/Chicken pizza that was quite fantastic. Even hubs managed to mumble the words “holy cow this is good” between bites. Here’s what I did:

artpizza


Chicken Spinach Artichoke Pizza

  • 1 pizza crust of your choice (homemade or store bought)
  • 1 can of artichoke hearts (or 1 bag frozen, thawed and drained)
  • 1 small onion (or half of a large one) ~ diced
  • 1 large skinless boneless chicken breast (or about 8 chicken tenders)
  • 2 cloves of garlic ~ minced
  • 1 tbsp of butter
  • 1 package cream cheese (light or regular)
  • 1 box frozen spinach (thawed and water squeezed out)
  • 2 cups (or more!) shredded mozzarella cheese
  • 1/4 cup shredded parmesan cheese
  • Salt and pepper

artpizza2

  1. In a medium skillet, cook your chicken in a drizzle of olive oil on medium heat until cooked through, turning once. Season with salt and pepper. Transfer cooked chicken to a paper towel to drain and cool. Cut or shred chicken into bite-sized pieces
  2. In a medium skillet or saucepan heat onion and garlic in the butter until soft, about 5-8 minutes.
  3. Add cream cheese to onion mixture and heat just until cream cheese is melted. (stirring often)
  4. Meanwhile preheat oven to 450 degrees.
  5. Add artichoke hearts to melted cream cheese. Stir. Heat for one minute.
  6. Stir in spinach to melted cream cheese mixture. Heat for one minute longer.
  7. Roll out your pizza crust onto lightly greased baking sheet.
  8. Spread the cream cheese mixture onto pizza crust. Spread to within 1/2 inch of the end of crust.
  9. Place chicken pieces on top of cream cheese mixture. Sprinkle mozzarella on top of that, then topping with the parmesan.
  10. Place into the preheated oven for 10-15 minutes or until cheese is melted and crust is desired crispiness.
  11. Enjoy!

Next up…I’m thinking an artichoke crostini with some of that yummy peasant bread that I made earlier in the week!

Side note: This is what it looked like outside of my kitchen window this morning. Wind chill is in the single digits. Lord only knows when I’ll get to my garden. I have the itch terribly!!

march262014

Posted in Uncategorized | Tagged , , , , , , , | Leave a comment

Peasant Bread ~ Easiest Bread Ever

bread2

I have finally found a no-knead bread that is quick, easy and doesn’t affect my flour phobia. Yes, I despise touching flour. Don’t ask. I don’t know. I think it’s a tactile thing. But it gives some real heebie jeebies! Anyway…

As I was spending some time in Pinterestland I came across a bread recipe that not only didn’t require me to touch flour, but it also didn’t require kneading the dough, waiting 12 hours until you can bake it or even a loaf pan! MY kind of bread recipe! I first saw it here at Alexandria Cooks. She gave such detailed instructions that even I could follow. So I had a go at it. And bang! Success!

It’s quite simple really. Here’s how to make this delicious, hearty, buttery bread:

Peasant Bread

  • 4 cups (510 g | 1 lb. 2 oz) all-purpose flour* (do not use bleached all-purpose)
  • 2 teaspoons kosher salt
  • 2 cups lukewarm water
  • 1 tablespoon sugar
  • 2 teaspoons active-dry yeast
  • room temperature butter, about 2 tablespoons
  1. Mixing the dough:
    • If you are using active-dry yeast: In a small mixing bowl, dissolve the sugar into the water. Sprinkle the yeast over top. Let it stand for about 10 to 15 minutes or until the mixture is foamy and/or bubbling just a bit — this step will ensure that the yeast is active. Meanwhile, in a large bowl, whisk together the flour and salt. When the yeast-water-sugar mixture is foamy, stir it up, and add it to the flour bowl. Mix until the flour is absorbed.• If you are using instant yeast: In a large mixing bowl, whisk together the flour, salt, sugar, and instant yeast. Add the water. Mix until the flour is absorbed.

2.  Cover bowl with a tea towel or plastic wrap and set aside in a warm spot to rise for at least an hour. (If you have the time to let it rise for 1.5 to 2 hours, do so — this will help the second rise go more quickly.)

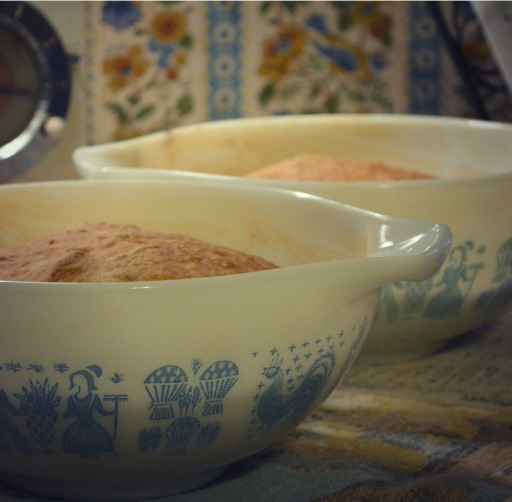
3.  Preheat the oven to 425 degrees. Generously butter the inside of two medium oven-safe bowls (such as Pyrex bowls). Using two forks, punch down your dough, scraping it from the sides of the bowl and turning it onto itself. Divide the dough into two sections and put each half into one of your buttered bowls. (I use a large metal spoon for this part as the dough is quite slippery). Let the dough rise for another 20 – 30 minutes.

4.  Bake for 15 minutes. Reduce the heat to 375º and bake for 15 to 17 minutes longer. Remove from the oven and turn the loaves onto cooling racks. If you’ve greased the bowls well, the loaves should fall right out onto the cooling racks. Your bread should be golden brown. If not, pop back into the oven (on the cooling racks) for another 5 minutes.

bread3

5. Enjoy! And there is no doubt in my mind that you will!

Posted in Uncategorized | Tagged , , , , , , , , | 7 Comments